
Stop Wasting Time at the Copier: How to Master Ricoh’s Collate Function
How to Collate on a Ricoh IMc & IM Series Copier (Step-by-Step Guide)
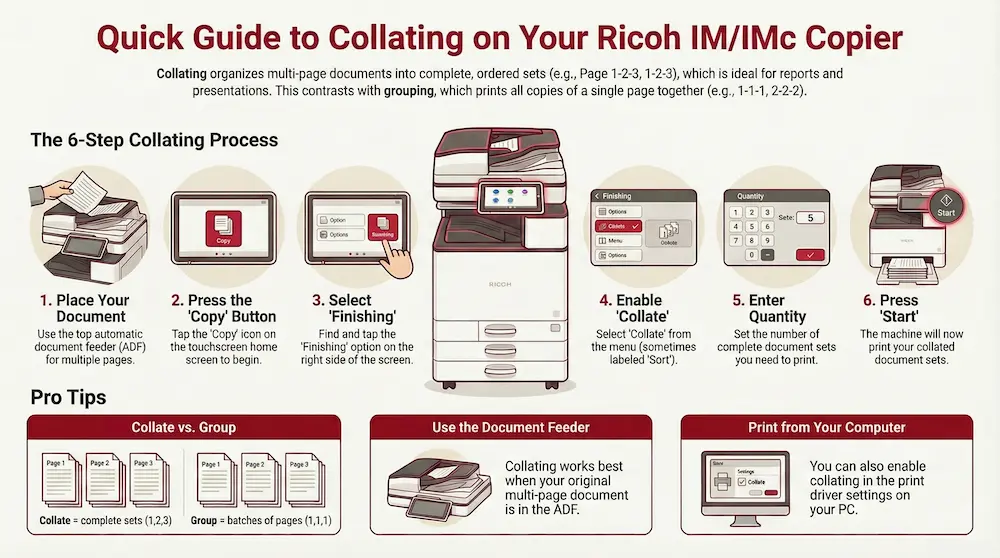
Learn how to collate documents on a Ricoh copier, avoid grouped printouts, and create perfectly ordered sets every time using the collate or sort.
The Unseen Time-Waster
We’ve all been there. You need to print ten copies of a 15-page report for a meeting. You walk over to the Ricoh copier, punch in the numbers, and hit “Start.” What comes out is a massive, disorganized stack of paper: fifteen copies of page one, followed by fifteen copies of page two, and so on. Now, you’re stuck manually sorting every single set by hand.
This common frustration is caused by overlooking a simple, underutilized feature on most office copiers. The good news is that there’s an easy way to avoid this manual sorting forever.
This article will reveal four key insights about the “Collate” function on Ricoh copiers that will streamline your printing workflow and save you valuable time.
Understand the Difference Between “Collating” and “Grouping”
You’re Not Just Making Copies, You’re Building Sets
The most common reason for print jobs coming out in the wrong order is a misunderstanding between two fundamental settings: Collate (or Sort) and Group. They sound similar, but their functions are complete opposites.
- Collate/Sort: Creates complete, ordered sets of a document. If you print three copies of a three-page document, it will produce them in this order: page 1-2-3, then another page 1-2-3, then a final page 1-2-3.
- Group: Prints all copies of each page together. Using the same example, this setting would produce all copies of page 1, then all copies of page 2, and then all copies of page 3 (i.e., 1-1-1, 2-2-2, 3-3-3).
Many office workflows default to ‘Group,’ assuming users are printing single-page flyers or memos. The moment you’re printing a multi-page document for distribution—a report, a presentation, or training packet—you need to actively select ‘Collate’ to get a usable result.
Collating is essential for creating ready-to-distribute documents like reports, presentations, proposals, and training materials without any manual sorting.
The “Collate” Button Might Be Hiding in Plain Sight
It’s Not Always Called ‘Collate’
On Ricoh IM and IMc series copiers, the option to collate your documents is found within the “Finishing” menu on the main copy screen. However, you might not see a button explicitly labeled “Collate.”
Crucially, on these devices, the function may be labeled either “Collate” or “Sort.” Both buttons perform the exact same function: organizing your copies into complete, ordered sets. Knowing this simple terminology difference can save you from minutes of frustrated searching through menus for a button that might not exist under the name you expect.
Your Copier’s Finishing Moves Depend on Hardware
Unlocking Your Copier’s Full Potential
The “Finishing” menu can offer more powerful options beyond just collating your documents. Depending on your machine’s configuration, you may see advanced options such as:
- Staple
- Hole Punch
- Booklet
Here’s a crucial piece of inside knowledge: those options on the screen aren’t just software toggles; they are direct commands for a physical hardware unit called a “finisher.” If the buttons are grayed out or missing, it means your machine doesn’t have that component installed. Knowing this saves you from trying to enable a feature your copier physically cannot perform. This understanding turns a multi-step manual process into a single, automated job, transforming a simple copy request into a professionally finished document ready for distribution.
You Can Collate Without Leaving Your Desk
Master Your Prints from Your Computer
The ability to collate documents isn’t limited to the copier’s touchscreen. You can, and should, manage this setting directly from your workstation for a more efficient workflow.
When you send a document to the Ricoh copier from your computer, you can enable collating directly within your computer’s print driver settings. This is a massive productivity win because it allows you to build the entire job—collated, stapled, and ready to go—before it ever leaves your computer. This proactive approach eliminates surprises at the printer tray and prevents the dreaded walk of shame back to your desk to re-send a job that came out wrong. It transforms printing from a two-step process (send, then configure at the machine) into a single, fire-and-forget action.
A Smarter Way to Print
By mastering a single function, you can eliminate one of the most common office workflow frustrations. By understanding the key difference between Collate and Group, knowing its alternate name (“Sort”), leveraging your machine’s hardware finisher, and setting your preferences from the print driver, you can take full control of your document output.
What other underutilized features in your office technology could be saving you time every day?